

Quick Links
A poster session is a graphic presentation of an author’s research. Authors illustrate their study findings through graphs, tables, photos, and diagrams that accompany a minimal amount of text on the poster boards. Posters are to highlight the high points of the presentation.
SETTING UP YOUR ONLINE PRESENTER PROFILE
Every poster presenter will receive an invitation to the conference speaker portal. Here you will be able to upload your headshot and bio, provide contact information for attendees to contact you, and upload your poster. Ensure you complete the following presenter activities by September 9, 2024.
- Update your biography
- Upload your photo
- Update your speaker profile
- Upload your poster
As a reminder, all poster presenters are required to register for the conference by September 2, 2024.
Invitations to access the speaker portal were emailed to poster presenters August 12, 2024. If you did not receive an invitation, check your spam folder. If you are still unable to locate the invitation email, contact the 2024 STI Prevention Conference Planning Committee at conference@ashasexualhealth.org.
POSTER DIMENSIONS
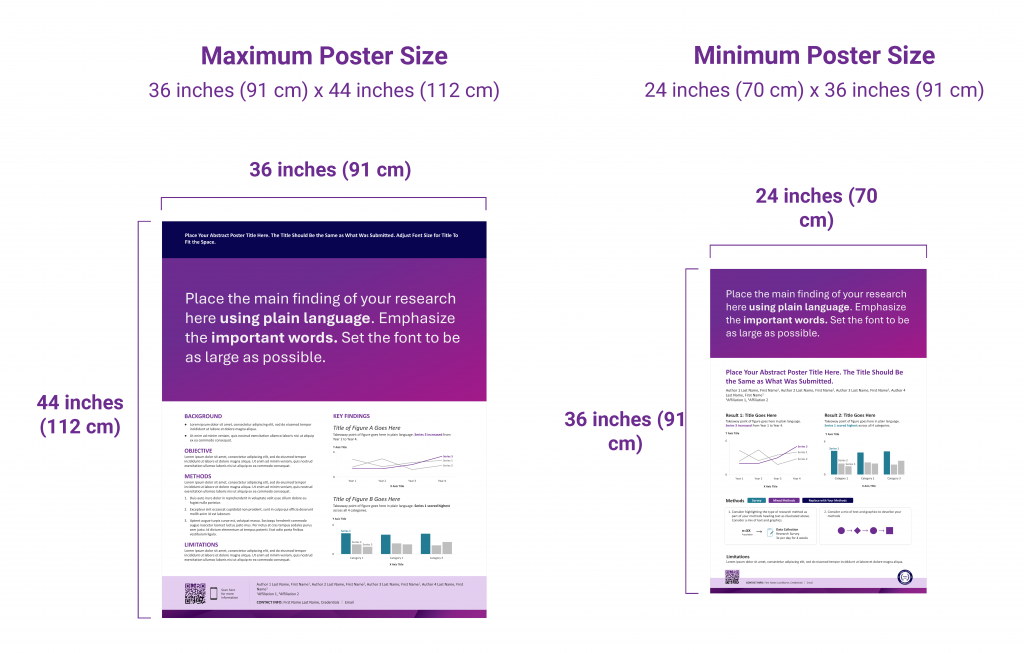
The recommended poster size is 36 inches (91 cm) wide by 44 inches (112 cm) high. Posters may not exceed the recommended poster size, as each poster board will hold two posters. Posters may be smaller than the recommended size but should not be smaller than 24 inches (70 cm) by 36 inches (91 cm) to ensure poster text is readable at a minimum distance of 3 feet or one meter.
Acceptable Poster Sizes
PRESENTING YOUR POSTER DURING THE POSTER VIEWING SESSION
Poster viewing sessions are 60 minutes in length. No audio-visual equipment can be used in poster viewing sessions. Posters are grouped by topic area in the poster hall. The poster hall is located in the Galleria with the exhibitors.
The presenting author must be present during their assigned poster viewing session (i.e., Poster Viewing Session I or Poster Viewing Session 2) and is expected to remain at their poster for the entire session to answer any questions. Poster authors are encouraged to bring copies of their abstract or a handout for interested viewers. Please refer to the conference program for the poster viewing session times.
HANGING YOUR POSTER IN THE POSTER HALL
You will need to bring a printed copy of your poster to hang in the Galleria. Hang your poster on the board with the number that corresponds to your poster number. Your poster number can be found in the program or in your abstract acceptance email.
Presenters may choose to print on traditional poster paper or choose to print a fabric poster. Push pins will be provided to hang your poster.
You are required to hang your poster during one of the following poster set-up times.
• Monday, September 16, 11:00 AM – 5:00 PM
• Tuesday, September 17, 7:00 AM – 9:00 AM
Poster presenters are asked to remove their poster at the end of the Wednesday evening poster session. Any posters left on their boards after 7:00 PM Wednesday, September 18 will be discarded. Poster set up and take down is the sole responsibility of the presenter. If assistance is required, please visit the registration desk.
In addition to your printed poster, you also will be able to upload a digital PDF version of your poster for attendees to view through the conference app. Upload your PDF poster version, by Monday, September 9, 2024, using the personalized link to the speaker portal you received by email. Use the following file name format: Poster Number_Presenter Last Name (Example: P100_Smith).
WHAT TO INCLUDE ON YOUR POSTER
A traditional poster includes:
- Title
- Author’s name/s
- Author’s affiliation/s
- Contact information (e.g., website, email, phone)
- Methods section
- Results section
- Conclusions and implications
References and acknowledgements may also be included if there is space. It is not necessary to include your poster number on your poster itself. All poster text must be in English.
POSTER TEMPLATE
An STI Prevention Conference poster template is available for presenters to use but is not required.
The STI Prevention Conference poster template is based off the #betterposter campaign being used at many scientific conferences. The original better poster template designed by Mike Morrison focuses on a more user-friendly poster, free of clutter. This allows poster viewers to easily understand the main research finding in just a few seconds. To learn more about this poster layout and research behind the design choices, view the following videos.
POSTER DESIGN TIPS
Choosing the Right Font and Font Size
- Avoid all uppercase type for titles.
- Use no more than 2 or 3 compatible typefaces throughout the poster.
- Keep font size ≥ 24-point font for all text. Font sizes used in template poster as a sample:
- Main Finding or Title: 130 pts
- Subtitles: 44-72 pts
- Headings: 50-60 pts
- Body Text: 30 pts
- Figure Labels: 24 pts
Adding Tables, Figures, and Images
- Use graphic elements often. Posters are a visual format.
- Use photographs sparingly.
- Avoid using hand drawn images, figures, charts, or tables.
- Use high-quality images that look good on screen or printed. Avoid pixelated images.
- Use appropriate charts/graphs for the type of data you are presenting.
- Pie charts are best for showing percentage breakdowns of a whole.
- Line charts are best for showing trends.
- Bar charts are best for comparing quantities.
- Tables are best for showing side-by-side comparisons of quantitative data.
- Label all figures, drawings, photos, charts, and graphs.
- Give credit to the original creator of an image or graphic.
Deciding on Layout and Text
- Keep at least a 1-inch margin on all sides.
- Limit the amount of text on the poster to 300-500 words.
- Break up longer sections of text with graphics or bulleted lists.
- Use plain language. Avoid acronyms and jargon unless the majority of viewers know them.
- Use blank space to avoid a cluttered look, and to create defined sections of your poster. Blank space is your friend!
Choosing Colors
- Use a high contrast between the color of the text and the background. For example, use a light color for the background with a dark colored text or a darker background with light text.
- Avoid harsh colors (e.g., neon colors) or color combinations that are hard to read (e.g., red and green, red and black, light green and yellow, green and blue, purple and red).
- Limit the number of colors (photos and drawings don’t count) on the poster to 3 or 4.
- Use color and design to create a point of emphasis and a flow for the viewer’s eye to follow.
- Use color to evoke emotion that reinforces what your poster is teaching.
Designing for Accessibility
Ensure accessibility by considering these recommendations:
- Color Contrast: To maximize readability, ensure there is sufficient color contrast between text and background colors. Use a color contrast checker such as WebAIM to check contrast between text and background color.
- Text Alternatives: For all meaningful images, develop descriptive text, known as alternative text or alt text for short, that screen readers can detect. The alt text should be concise and illustrative.
Note: Microsoft PowerPoint has a built-in accessibility checker that is located under the Review tab.
Adding Quick Response (QR) Codes
The STI Prevention Conference supports the use of presenters using QR codes on posters, slides, and other resources. Follow the guidelines below if using QR codes.
- QR codes must link to educational content relevant to the poster or presentation on which the QR code is place.
- Do not use QR codes to link to advertisements, copies of audio or video presentations, or websites with for-profit company branding.